Easy No-Bake Ice Cream Cake: Your Guide to Sweet Success
Imagine the perfect dessert: cool, creamy, crunchy, and utterly satisfying, without ever turning on your oven. That's the magic of an easy no-bake ice cream cake! This isn't just a dessert; it's a celebration in every slice, a customizable masterpiece that consistently steals the show. Forget the store-bought versions – creating your own homemade ice cream cake is surprisingly simple, incredibly rewarding, and guaranteed to impress your guests, leaving them wondering if you secretly moonlight as a pastry chef.
Whether you're planning a summer barbecue, a birthday party, or simply craving a delightful frozen treat, this no-bake wonder fits the bill. It's designed for convenience, allowing you to prepare it well in advance, freeing you up to enjoy the festivities. Get ready to embark on a sweet journey that promises delicious results with minimal effort.
Why a No-Bake Ice Cream Cake is Your Next Dessert Obsession
In a world of complex baking projects, the no-bake ice cream cake stands out as a beacon of delicious simplicity. It offers all the "wow" factor of a gourmet dessert without any of the stress. Here's why this delightful creation should be at the top of your culinary to-do list:
- Effortless Elegance: The term "no-bake" is music to any aspiring dessert maker's ears. This recipe eliminates the need for precise measurements, delicate crusts, or oven temperature worries. The beauty is in its assembly, not its complexity.
- Impressive Presentation: Despite its ease, a layered ice cream cake looks incredibly sophisticated. The distinct layers of ice cream, crunchy cookies, and luscious sauces create a visual feast that will undoubtedly elicit gasps of delight from anyone you serve it to. Your guests will be amazed when you reveal it's homemade! For more on dazzling your guests, check out our guide on Homemade Ice Cream Cake: Impress Guests with This No-Bake Treat.
- Ultimate Customization: This isn't a one-size-fits-all dessert. From your favorite ice cream flavors to unique crunchy layers and decadent toppings, every element of this cake is a canvas for your creativity. It truly allows you to design a dessert that perfectly matches your taste and occasion.
- Perfectly Make-Ahead: Requiring a minimum of 12 hours (and ideally longer) in the freezer, this ice cream cake is the ultimate make-ahead dessert. Prepare it a day or two in advance, and on the day of your event, simply pull it out and serve. This convenience is invaluable when hosting!
- Budget-Friendly Indulgence: While store-bought ice cream cakes can be pricey, making your own can be significantly more economical, especially if you snag your favorite ice cream and cookies when they're on sale. You get premium flavor without the premium price tag.
Crafting Your Perfect Ice Cream Cake: The Essential Layers
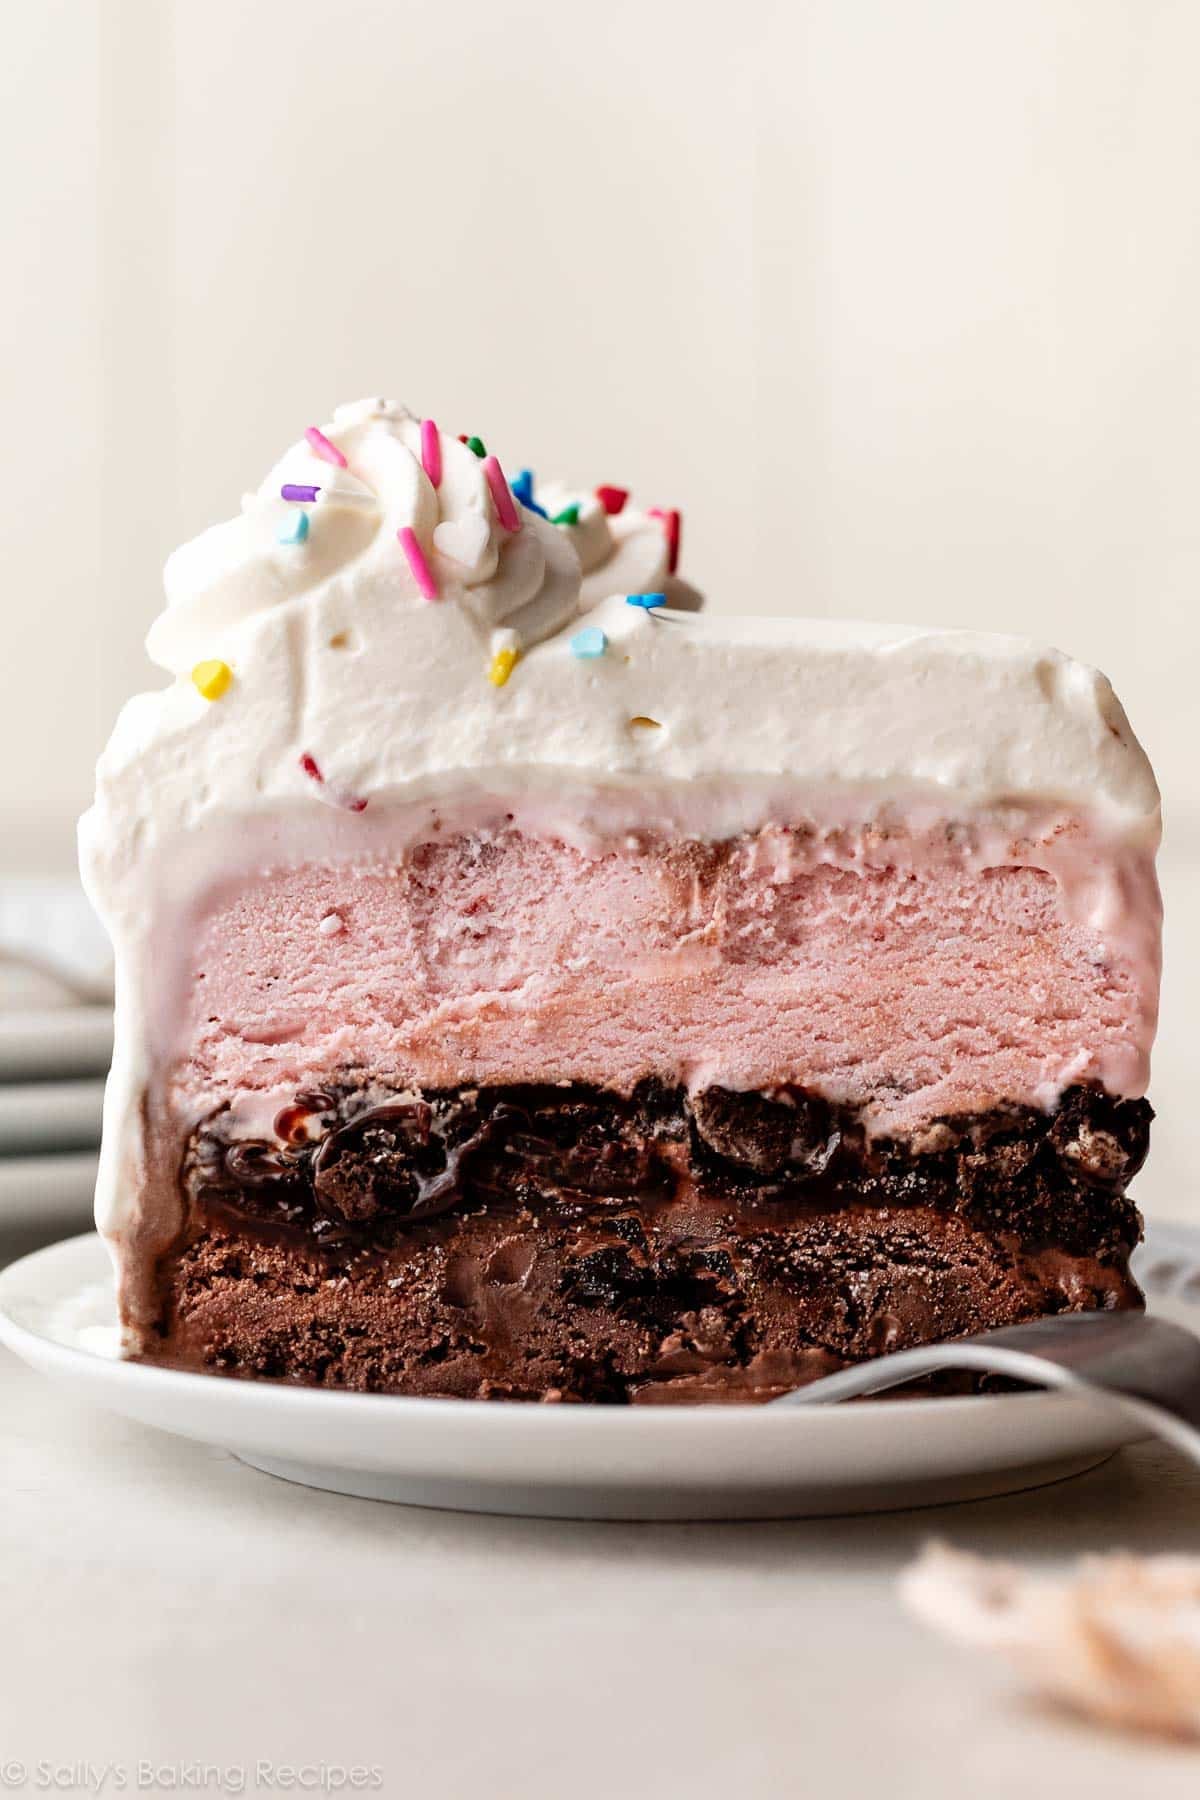
The magic of an ice cream cake lies in its distinct, delicious layers, each contributing to a symphony of flavors and textures. We're talking five layers of pure decadence, designed for maximum enjoyment and surprisingly simple assembly. Understanding each component is key to building your masterpiece.
The Creamy Foundation: Softened Ice Cream
Your journey begins with ice cream – and two generous 1.5-quart cartons of it! The key here is to allow your ice cream to soften to a spreadable consistency. This isn't just about ease of layering; it helps the layers adhere better once refrozen, preventing frustrating gaps or separation. Leave it on the counter for 15-20 minutes, or until it's soft enough to scoop and spread smoothly like soft-serve, but not completely melted.
The flavor choices are entirely up to you. Classic combinations like chocolate and strawberry are always a hit. But why stop there? Consider:
- Chocolate & Peanut Butter: A rich, nutty dream.
- Chocolate & Mint Chip: Refreshing and indulgent.
- Coffee & Cookies and Cream: For the ultimate coffee house experience.
- Cookie Dough & Vanilla Bean: A comforting, familiar pairing.
- Strawberry & Lemon Sorbet: For a lighter, fruitier twist (just ensure the sorbet also softens appropriately).
Mixing complementary or contrasting flavors adds depth and excitement to every bite. This is where your personalization truly begins!
The Irresistible Crunch: Oreo & Butter Bliss
This crunchy layer is a game-changer, providing a textural contrast that elevates the entire ice cream cake. While crushed Oreo cookies are the quintessential choice, mixed with melted butter, you can experiment with other options like graham cracker crumbs, shortbread, or even Biscoff cookies for different flavor profiles. The butter isn't just for flavor; it's a structural necessity.
Our secret weapon: The melted butter not only helps the cookie crumbs stick together, creating a stable, delightful base and middle layer, but it also ensures they adhere properly to the ice cream. We've learned from experience that skipping the butter can lead to a crumbly mess, with layers literally separating. So, don't skimp on this crucial ingredient – it's the glue that holds your crunchy dreams together while maintaining that satisfying texture.
The Decadent Drizzle: Homemade Hot Fudge (or Store-Bought Shortcut)
A ribbon of rich, gooey hot fudge woven through your ice cream cake is a touch of pure indulgence. While you can certainly use a good quality store-bought hot fudge for ultimate convenience, we wholeheartedly recommend making your own. It takes barely 5 minutes on the stove and delivers unparalleled depth of flavor and a wonderfully smooth texture that simply can't be beaten by a jarred alternative.
Homemade fudge allows you to control the sweetness and richness, ensuring it perfectly complements your chosen ice cream flavors. It’s that extra homemade element that truly distinguishes your creation.
The Second Flavor Flourish: More Ice Cream Magic
Just like the first, your second layer of ice cream requires the same gentle softening. This is your chance to introduce a new flavor dynamic or reinforce the first with a delicious contrast. Think about how the flavors will interact – perhaps a rich chocolate base followed by a refreshing mint, or a classic vanilla topped with a vibrant berry swirl. Remember, consistency is key; ensure it's spreadable but not soupy for the best results.
The Cloud-Like Crown: Fluffy Whipped Cream & Festive Garnishes
Crowning your ice cream cake with a generous layer of freshly made whipped cream is the perfect grand finale. Again, homemade whipped cream is quick, easy, and far superior to aerosol cans. It provides a light, airy counterpoint to the rich layers beneath, and its subtle sweetness balances the other components beautifully. You'll want enough to cover the top and perhaps pipe some decorative borders or swirls.
To truly complete your masterpiece, don't forget the garnishes! A sprinkle of festive rainbow sprinkles, a dusting of cocoa powder, chocolate shavings, fresh berries, or even extra crushed cookies can add visual appeal and an additional pop of flavor. This is your final opportunity to personalize and make your cake sing! For more ideas on how to customize your layers and flavors, check out our guide: Build Your Dream Ice Cream Cake: Customizable Flavors & Layers.
Step-by-Step Assembly: Your Path to Sweet Success
Assembling your no-bake ice cream cake is a straightforward process, mainly involving layering and patience. The "back-and-forth" trips to the freezer are crucial for maintaining the integrity of each layer, ensuring a clean slice and preventing a melted mess.
What You'll Need:
- A 9-inch springform pan (highly recommended for easy release).
- Parchment paper (to line the bottom of the pan for an even cleaner release).
- Spatulas for spreading.
The Assembly Process:
- Prep Your Pan: Line the bottom of your springform pan with parchment paper. This simple step will make serving incredibly easy.
- First Ice Cream Layer: Spread your first softened 1.5-quart carton of ice cream evenly over the bottom of the prepared pan. Work quickly. Smooth the top and place the pan in the freezer for at least 30-45 minutes to firm up.
- Crunchy Layer: While the first ice cream layer is chilling, prepare your crushed cookie and melted butter mixture. Once the ice cream is firm, carefully spread the cookie mixture over it. Gently press it down with the back of a spoon or your hands. Return to the freezer for another 30 minutes.
- Hot Fudge Drizzle: If making homemade hot fudge, do so now. Once the cookie layer is firm, drizzle about half of your hot fudge (or store-bought) over the cookie layer. You can spread it lightly or leave it a little chunky for texture. Freeze for 15-20 minutes to set the fudge.
- Second Ice Cream Layer: Spread your second softened 1.5-quart carton of ice cream evenly over the fudge layer. Smooth the top. Back to the freezer it goes for a minimum of 3-4 hours, or until very firm.
- Final Touches: Once the cake is completely firm, you can add your whipped cream topping. Spread it evenly or pipe decorative flourishes. Drizzle with the remaining hot fudge and add your chosen sprinkles or garnishes.
- The Grand Freeze: This is the most important step! Return the finished cake to the freezer for at least 12 hours, but preferably 24 hours, to allow all layers to firm up completely and meld together beautifully. This ensures clean slices and a stable structure.
Practical Tips for Ice Cream Cake Mastery:
- Work Quickly: When dealing with softened ice cream, speed is your friend. Have all your components ready before you start assembling.
- Even Layers: Use an offset spatula or the back of a spoon to spread layers evenly. This ensures your cake looks professional and every slice has a balanced taste.
- Chill Between Layers: Don't skip the freezing time between layers. This is essential for preventing colors and flavors from bleeding into one another and maintaining definition.
- Serving: For the best serving experience, remove the ice cream cake from the freezer about 10-15 minutes before slicing. This allows it to soften just slightly, making it easier to cut through, but not so much that it melts. Run a sharp knife under hot water before each cut for perfectly clean slices.
- Storage: Keep any leftover cake tightly wrapped in plastic wrap and stored in the freezer for up to 2-3 weeks.
Conclusion
Making your own no-bake ice cream cake is more than just a recipe; it's an experience that combines fun, creativity, and undeniably delicious results. With its customizable layers, make-ahead convenience, and impressive presentation, it's the ultimate dessert for any occasion, from casual summer gatherings to elegant celebrations. You'll love the simplicity of its construction and the sheer joy of watching jaws drop when you reveal your homemade masterpiece. So, gather your favorite ice cream, some crunchy cookies, and a little imagination, and get ready to create a sweet success that will have everyone asking for another slice!
